

Friday, December 31, 2010
Happy New Year
I would just like to wish eveyone a very Safe and Happy New Year!!!! May the new year bring you joy, wealth and success.

Thursday, December 30, 2010
First Tutorial.... Children's Apron
Well I thought it was time that I posted my first tutorial so here goes:
A couple of months ago my mum and I were at Spotlight and I noticed that the quilting material was half price so I just had to get the Michael Miller High Tea and Yummy fabric as I have been meaning to make my girl's and their cousin an apron and matching chef's hat for playing dress ups.
The first one I made was for my 4 year old niece for Christmas:


For the Chef's hat, awhile ago I found a great tutorial that you can download from Making It Fun. Check out this great blog and all the other great tutorials that you can try.
Here are a few more tutorials that I have found:
Oven Mitt tutorial at Skip to my lou
How to make a Chef's Hat for your budding masterchef at Curly Pops.
An Apron in an Hour by Stop sharing and start sewing
Make an Oven Mitt! at Prudent Baby
Free Pattern: Mini Me Apron Set at Living with Punks
Favourite Oven Mitt Tutoral with template at Pickup Some Creativity
Child sized oven mitt at Lily Bug Designs
Happy Sewing!!!!!
A couple of months ago my mum and I were at Spotlight and I noticed that the quilting material was half price so I just had to get the Michael Miller High Tea and Yummy fabric as I have been meaning to make my girl's and their cousin an apron and matching chef's hat for playing dress ups.
The first one I made was for my 4 year old niece for Christmas:

Materials:
1 metre Michael Miller's Yummy fabric
1 metre natural calico
2 metre's red cotton heading tape (25mm)
3 metre's red bias bind tapes (25mm)
2 buttons
Before I started I actually ironed the bias tape in half (double folded) as this is the first time I have really used it and I found it easier to pin to the edge of the apron.
So for a template I used my daughter's apron from her Jamie Durie's gardening set for kids:

Step 1: fold your template and fabric in half (fold fabric with right side facing in) then place the template on the fold of the fabric. Draw outline of the template and cut out (I am using calico for the back of the apron and for the top of the matching chef's hat).
 |
| back of apron |
 |
| front of apron |
Step 2. Now pin together the two fabrics with right sides facing out and sew together.

Before I pinned the bias tape on, I trimmed any over hanging fabric.

Step 3. Now for the bias tape. At the beginning fold the end of the bias tape for a nice neat finish:

then you pin all away around the apron and leave a bit of length at the end so that you can tuck it under the beginning of the bias tape:

Step 4. Now sew all away around. I put the bias tape join at the bottom of the apron.

Step 5. Now for the straps. The apron that I have used as a template uses Velcro on the straps but I decided that I wanted to add a button hole at one end of the heading tape as I have some really cool buttons that will go so well with this fabric.

Now for some reason I have not taken any photo's of what I did for this part but here goes:
Cut a 50cm strip of the red heading tape and fold ends about 1 cm and sewed for a neat edge.
Step 6. Sew one end of the tape to the top of the apron and then on the other end make a button hole (i used my button hole attachment for my machine). If you don't have a button hole attachmeant for your machine, you can sew on velcro and still sew a button on the top.

Step 7. Sew the first button on top of the heading tape that you have attached to the apron. Then sew the other button to the apron so that you can place the button hole end of the tape over the button to secure.
Where did I get the buttons will I purchased an assortment of Beutron buttons from spotlight that has hearts, flowers, stars, whales, bows, apples and of course these cute tea pots. I thought the light green ones suited the apron best:

Step 8. So now for the ties on the apron. I just cut the rest of the heading tape in half, sewed about 1 cm at the end over for a neat finish, then attached them about half way down each side of the apron:

 |
| And here is the finished apron! |
Here are a few more tutorials that I have found:
Oven Mitt tutorial at Skip to my lou
How to make a Chef's Hat for your budding masterchef at Curly Pops.
An Apron in an Hour by Stop sharing and start sewing
Make an Oven Mitt! at Prudent Baby
Free Pattern: Mini Me Apron Set at Living with Punks
Favourite Oven Mitt Tutoral with template at Pickup Some Creativity
Child sized oven mitt at Lily Bug Designs
Happy Sewing!!!!!
Wednesday, December 29, 2010
My first tutorial....But first
Hello everyone
Did we all survive the Christmas festivities and the rain. I will be posting my first tutorial tomorrow but first I thought I would share a video that I came across while looking up bias tape making.
If you don't have a bias tape making machine, a bias tape accessory for your sewing machine or even one you use on your ironing board well this is the video for you!
Happy Sewing!!!
Friday, December 24, 2010
It's that time of year again.
Yep it's that time of year again and I just wanted to wish everyone a

Hope you all have a wonderful time with your friends and family and please be safe where ever you are.
From
Jennifer

Very Merry Christmas
Hope you all have a wonderful time with your friends and family and please be safe where ever you are.
From
Jennifer
Wednesday, December 22, 2010
Free Patterns at HomeSpun Threads
At HomeSpun Threads you can download any of the 29 patterns for free! Yep that is right for FREE. After you choose your pattern and go to the checkout you will be able to download a pdf file that has detailed step by step instructions with photo's.
I have always wanted to make the pleated ballerina shoes so I have downloaded the huge baby shoe pattern set:
So head on over to HomeSpun Threads and check out the free patterns and while you are there have a look at their great blog.
Happy Sewing
Jennifer
I have always wanted to make the pleated ballerina shoes so I have downloaded the huge baby shoe pattern set:
 |
| Huge Baby Shoe Pattern |
Happy Sewing
Jennifer
Personal Santa Claus Video
A very good friend of mine sent a link to me today for the Portable North Pole.
Here you can make a personal video from Santa to your child. I have already made one for each of my girl's and can't wait for Daddy to get home so that we can all sit down and watch it together.
All you have to do is following the instructions and upload a few pic's and then you can preview the video before it is sent to your email address. And if you would like to keep the video you can purchase it from the site
So go ahead and make your own video, I'm sure your the kid's well love it!!
Merry Christmas!!!
Flower Sugar Giveaway
One of the fabulous blogs that I follow is having a fabric giveaway! . Retro Mummy is giving away 2 fat quarters of each of the Flower Sugar range by Lecien, yes that means you will receive 20 fat quarters:

To enter just mention the giveaway on your blog along with a link back and leave a comment on Retro Mummy. If you do not have a blog, No Problem! just leave a comment. Giveaway is drawn on New Years Eve.
Good Luck!!!!!

To enter just mention the giveaway on your blog along with a link back and leave a comment on Retro Mummy. If you do not have a blog, No Problem! just leave a comment. Giveaway is drawn on New Years Eve.
Good Luck!!!!!
Monday, December 20, 2010
Up Cycling Clothes
Do you have a few skirts lying around your wardrobe or have you found a few skirts that you haven't worn in such a long time or doesn't fit anymore. Well if you have little girl's like me who absolutely love dresses you can turn your skirt into a dress for your daughter/s to wear.
There are lots of different tutorials out there for what is called up cycling your clothes, I even found a book at the library called Fashion T-shirts: easy-sew projects for fun fashion by Lorine Mason, which has step by step instructions on how to up cycle, of course, t-shirts. I liked it so much that I bought a second-hand copy from Amazon :

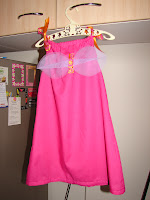
During one of my visits to our local charity store I found 2 skirts that I thought would make great dresses for my 2 little girls and they were only 3 dollars each. Unfortunately I did not take a before photo of the skirts but here is how they turned:

The brown and blue skirt was really easy to change into a dress as the zipper was at the side. All I had to do was put it on my 4 year old, mark where to cut for it to fit and then cut and sew down one side. I used the off cut to make the straps.
With the pink and white dress, the zipper was at the back, so I had to mark both sides then cut and sew, trying to make sure that both sides matched. Again I used the off cuts for the straps.
I used the tutorial from the blog V and Co . This wonderful blog is by Vanessa Christenson who is a stay at home mum in the United States. The blog has lots of great tutorials and you can also purchase a step by step pdf of any of the tutorials from Vanessa's My Shop page.
I have a tub full of clothes to upcycle so hopefully in the new year I can come up with a few tutorials of my own.
So go one give it a go and have a look at Vanessa's blog, which I'm sure will give you lots of imspiration.
Happy Sewing
Jennifer
There are lots of different tutorials out there for what is called up cycling your clothes, I even found a book at the library called Fashion T-shirts: easy-sew projects for fun fashion by Lorine Mason, which has step by step instructions on how to up cycle, of course, t-shirts. I liked it so much that I bought a second-hand copy from Amazon :


The brown and blue skirt was really easy to change into a dress as the zipper was at the side. All I had to do was put it on my 4 year old, mark where to cut for it to fit and then cut and sew down one side. I used the off cut to make the straps.
With the pink and white dress, the zipper was at the back, so I had to mark both sides then cut and sew, trying to make sure that both sides matched. Again I used the off cuts for the straps.
I used the tutorial from the blog V and Co . This wonderful blog is by Vanessa Christenson who is a stay at home mum in the United States. The blog has lots of great tutorials and you can also purchase a step by step pdf of any of the tutorials from Vanessa's My Shop page.
I have a tub full of clothes to upcycle so hopefully in the new year I can come up with a few tutorials of my own.
So go one give it a go and have a look at Vanessa's blog, which I'm sure will give you lots of imspiration.
Happy Sewing
Jennifer
Friday, December 17, 2010
The Crayon Roll
This year I wanted to make a few birthday presents for kid's as I find something handmade is more personal then buying them clothes or a toy that might just get thrown in the corner.
So went I found this Crayon Roll tutorial at Chocolate on my Cranium I thought it was the perfect gift as it was compact and can be taken anywhere.
The tutorial has pictures for each stage and easy to follow instructions.


This was the first Crayon Roll that I made and the first time I have ever done applique which I wish I had done better.


Jennifer
So went I found this Crayon Roll tutorial at Chocolate on my Cranium I thought it was the perfect gift as it was compact and can be taken anywhere.
The tutorial has pictures for each stage and easy to follow instructions.


This was the first Crayon Roll that I made and the first time I have ever done applique which I wish I had done better.


Then I made 2 more for another Jack and my nephew Curtis. The material I used for the pockets for the crayons and the applique I found when looking for pillowcases for the girl's fairy dresses.
The last one I made was for a little girl in Grace's kindy class. The more applique I have done the easier I now find it plus I'm getting to know my sewing machine better and what size zigzag stitch to use.


Now all you have to do is roll them up and wrap along with a few colouring books!


Hope you have fun!
Happy Sewing
Jennifer
Thursday, December 16, 2010
Pancakes
My girl's just love pancakes and I found a basic pancake recipe on the net and cannot remember where I found it so I apologise to the person/website for not giving them credit.
The pancakes always turn out thick and fluffy and if you use a tablespoon of batter for each pancake it should make around 20.
So here it is:
2 cups flour (sifted)
1 3/4 cup of milk
2 tbsp baking powder
2 eggs
1/4 cup melted butter (you don't have to included but helps with the non sticking)
3 tbsp sugar
1 tsp salt
Just sift flour and add the rest of the ingredients and mix together.
I love Nigella Lawson and they are currently re-running her Nigella Express series on ABC1. On yesterdays episode Nigella made Donut French Toast which looks very sweet and very yummy, but it was the sauce she made that really grabbed my attention. It was a strawberry jelly I thought would be great on my pancakes.
If you haven't seen the episode here it is:
Happy Cooking
Jennifer
The pancakes always turn out thick and fluffy and if you use a tablespoon of batter for each pancake it should make around 20.
So here it is:
2 cups flour (sifted)
1 3/4 cup of milk
2 tbsp baking powder
2 eggs
1/4 cup melted butter (you don't have to included but helps with the non sticking)
3 tbsp sugar
1 tsp salt
Just sift flour and add the rest of the ingredients and mix together.
 |
| And here they are, don't they look yummy! |
If you haven't seen the episode here it is:
Happy Cooking
Jennifer
Wednesday, December 15, 2010
Baby Shoe's
Don't you just love baby shoe's. There are some really cute ones out there but I wondered how hard it would be to make them myself.
So of course I googled it, and I found this lovely tutorial by I just had to try this..., which has step by step instructions with pictures and a link to the pattern that you can print.
I was able to make these shoes with one rectangle of felt that you buy at any fabric/craft or discount store. I also used some spare material to make the bottom of the shoe non slip.
Sorry I thought I had taken more photo's but can't seem to find them. I made a second pair of shoes for a special little girl called Amelia who sadly passed away a few weeks ago.

So of course I googled it, and I found this lovely tutorial by I just had to try this..., which has step by step instructions with pictures and a link to the pattern that you can print.
I was able to make these shoes with one rectangle of felt that you buy at any fabric/craft or discount store. I also used some spare material to make the bottom of the shoe non slip.
 |
| Here is the the pattern already to be cut |
 |
| and here is the finished product! |

Amelia Grace McGowan was born on 14th August 2010 and left us on 21st November 2010. After losing their daughter Linda and John were presented with a beautiful silver locket from the Logan Hospital, so Linda has started a Facebook page in her daughters name called Amelia's Locket's so that people can donate lockets to other families who have lost a child to SIDS, stillbirth or other causes.
Please take a look at Amelia's Locket's on Facebook and have fun making shoes for your friends babies or even your own.
Happy Sewing
Jennifer
Tuesday, December 14, 2010
So what to do first?
While reading through all the wonderful blogs that are out there I discovered the pillowcase dress. That's right the pillowcase dress. There are so many different tutorials out there for this dress and you can find it in Craft Challenge: Dozens of Ways to Repurpose a Pillowcase by Suzanne J.E Tourtillott .
My girl's love to dress up like fairies and I thought what a great and cheap way of making them a few fair dresses to wear.
So my Mum and I went searching for pillowcases:


My girl's love to dress up like fairies and I thought what a great and cheap way of making them a few fair dresses to wear.
So my Mum and I went searching for pillowcases:

and this is what we found!
I already had pink Tulle at home from another project and I used the white pillowcases with pink flowers to make the dresses, the other pillowcases I used for the inside of a crayon rolls that I have made as gifts (that's for another day). The tutorial that I used was from Prudent Baby .
And here is the finished dresses:

I made the straps out of the bottom of the pillowcases that I cut off instead of using ribbon as per the tutorial. To make the wings all I did was fold 2 layers of tulle together and used a CD to make the wings a circular shape, them attached them to the dress with the pink ribbon.
I made two more one for my niece and one for a friend's little girl:


This time I used purple Tulle that I had for the wings and I bought some pretty ribbon for the straps and to attach the wings (please excuse the fridge in the background).
So if you haven't made these dresses before please have a go and if you have but haven't read the Prudent Baby blog please take a look and have fun as there are so many new and exciting ideas from other crafty mum's out there.
Happy Sewing!!!!
Jennifer
Thursday, December 9, 2010
Hello Blogging World!!
Hello to everyone or anyone who finds my little blog. This is the first time that I have ever blogged so please forgive me if I ramble on.
Why have I decided to start my own blog? Well it all started with a page suggestion from my sister in law on FaceBooks for Little Star Designs. Amanda from Little Star Designs makes beautiful custom made pillows as well as bags for kids and mum's and other wonderful accessories.
On this blog I also noticed that Amanda followed other blogs so I started looking at those blogs and from those pages more blogs and I just became addicted.
I had also been studying at Tafe and had pretty much stopped sewing and making crafts but after reading all these blogs, I cleaned the dust of my poor Janome sewing machine that my husband bought me 5 years ago for my birthday and started her up.
Once I started everything was like a running blog in my head so I have put the nerves aside and decided it was time to start my own.
So what do I hope to achieve with this blog? Well I hope that I can also encourage other people to start sewing or crafting or pass on a favorite recipe or two. And it might also keep my in my vegie garden too as it has been a little neglected of late. Also I would like to introduce books that I have found at our local library or introduce a tutorial or two that I have found and even create my own.
Anyway I am rambling now so I will say thank you for finding me and reading my blog and I hope you can get something out of it.
Have a great day
Jennifer
Subscribe to:
Posts (Atom)